Support

We are here to help

OnSite stands behind our products 100%. If you are having problems with installation, setup or with a specific product that seems to be failing, we are always just a phone call away. Most issues can be addressed over the phone. If you need more in-depth help, please contact your local dealer for service. 

Basic Troubleshooting

DO NOT do a MODULE Scan!

DO NOT Rescan Modules!It’s the first thing everyone wants to do, but it’s the worst thing you can do when you are trying to troubleshoot the system.

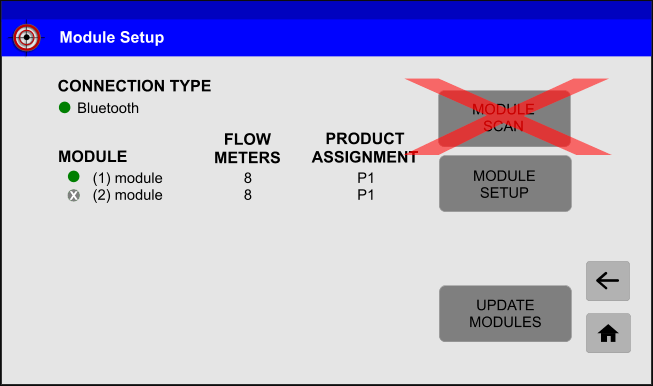
Rescanning the modules wipes out any saved settings and sets the system up fresh, like it is brand new. Rescanning the modules will only find the modules that are currently communicating with the system and eliminate the modules that are not. You won’t even know which module is having issues because all traces of the offline module will be erased like it was never connected at all.

Rescanning Modules won’t hurt anything, but it will make troubleshooting much more difficult if you can’t see the offline module(s) in the system. 

90%

of OnSite issues are due to
bad connections.

Every piece of your OnSite FMS kit was tested together at the factory before it shipped. The flow meters, modules, monitor and all the cables were all connected together, tested as a unit, and configured for your planter. Electronics can fail at any time, but rest assured that it all worked perfectly before it went in the box.

If you have a greyed out module (no communication), a loose plug or similar connection issue is usually the culprit.

Some of those plugs (especially the 6-pin Deutsch connectors) are pretty stubborn. The rubber seals are great for keeping dust and water out of the connector, but it sometimes makes it difficult to get the connectors fully seated and locked into place.

If one of those connectors doesn’t click into place, the rubber seal will eventually relax and push the connectors apart, breaking the connection. That’s how it can work in the morning and stop working in the afternoon. 

Troubleshooting a missing module 

  1. Simply unplug every connector in the OnSite FMS system one at a time and check each side for folded or pushed out pins.
  2. Plug them back in until you hear the audible click. This can take more force than it seems like it should. Don’t be afraid to lube the rubber seal a bit to get it to slide in easier.
  3. Reboot the system

Voila! The missing module(s) will usually show up like magic!  

If not, we move on to looking at sources of power.

Make sure you have
clean power.

If you are still experiencing issues, try powering OnSite from a traditional jump box or 12V battery. If the system works with a jump box, the problem is likely dirty power or a bad ground. 

Even constant power that has a slight pulse can cause issues at these low voltages.

Bluetooth systems are more susceptible to this because the power supplied by the planter is more likely to be affected by other components on the planter. Wired systems usually get their power from the convenience port in the cab, which tends to be pretty clean.

Make sure you are hooked up to
switched power.

  • Is OnSite wired directly to the battery of your tractor?
  • Do you have to manually power off the monitor after you turn off the tractor?
  • Does your system work great the first day, but when you come back the next day, it can’t find the modules?

If you answered yes to any of these questions, you are likely hooked up to constant power. 

OnSite FMS is specifically designed to use switched power. This allows the entire system to de-energize together when the tractor is turned off.

Manually shutting off the monitor does NOT shut off the modules or the cradle. Running power directly from the battery (constant power) gives nice clean power, but doesn’t allow the cradle and modules to ever power down. They continue looking for the monitor and trying to communicate with it. Eventually, the CAN bus system times out and it just stops looking.

The fix is simple. Unplug the entire system for a minute. Cutting power to the entire system forces the modules to reboot at the same time as the monitor so they can find each other again.

Troubleshooting

  1. Unplug everything from power.
  2. Wait 1 minute.
  3. Plug it back in and boot it up.
  4. Modules should come back online and you will be ready to go for the day!


Simple Fixes:

  • Change where you draw power from to a switched power source, like the convenience port in your cab.
  • Simply add a switch to the power cable between the battery and the cradle. 

Additional Troubleshooting Steps

This is always a great place to start when troubleshooting an OnSite FMS system. The modules should automatically recognize if there is power to them and they are connected together. Occasionally a cable or module can fail or the BlueTooth will lose connection, but the vast majority of the time its a power issues somewhere in the system, not a hardware issue.

Symptoms that you may have a power issue:

  1. Modules aren’t recognizing
  2. Modules are there, but are greyed out or are inactive.
  3. The monitor tablet isn’t charging
  4. The monitor tablet turns off after 30 seconds.
  5. LED lights on the modules aren’t lit.

OnSite FMS Service Light Locations on each type of Module.

Start by verifying the modules on the planter have power.

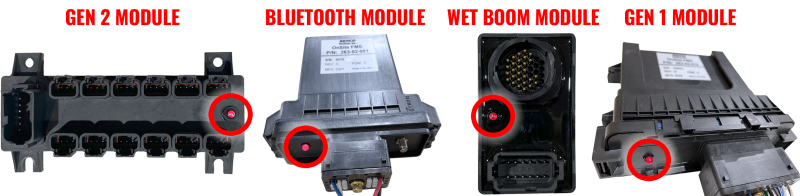
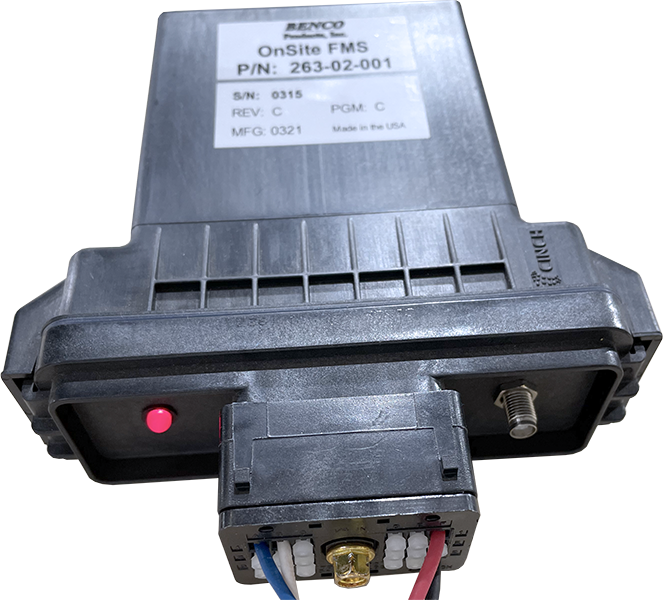
There is a little red light on the bottom of the OnSite Modules that will let you know if they have power and are getting / sending signals.

  1. Not Lit – No power to the module.
  2. Lit solid – You have power, but no connection to system
  3. Lit blinking – You have both power and connection.

Does anything else plugged into that harness have power?

If not, first check to make sure your harness connections are seated firmly. Then look at where you are drawing power from on the planter (Bluetooth only).

Never take power from pumps. They can cause power fluctuations that can affect the system’s performance and trigger other issues down the line.

If you are getting power from another component, make sure it has constant power and isn’t switched or on a controller of some kind.

Next, let’s look at the harness. 
It’s simple to test power on the harness. Use your multimeter to test the circuit. Put the red lead in Pin 2 and then test Pin 1 & 4 for a 12V signal with the black lead. 

  • Pin 2 (Red wire) = Constant Power
  • Pin 1 (Black wire) = Ground
  • Pin 4 (Green wire) = Switched Ground
 
If you have a dead wire, the pin may have pulled out of the plug, especially if there is a lot of tension on any wire in the harness. Try pushing on the wire to see if it will seat (you will hear a click).
 

If that isn’t the case, try swapping the modules on the planter (assuming your system has more than one). Does the problem follow the module or stay in the same place? 

If the issue stays in the same place, you know your modules are fine and you may have a bad harness. This is extremely rare, but it does happen. Give us a call at 605.213.1010 for a replacement. 

 If the problem moves with the swapped module, you may have a bad module or a bent pin. Give us a call at 605.213.1010 to get a replacement. 

If the module has power, it’s time to start looking at the communication side of things. There’s only so much troubleshooting you can do here, but the good news is that we seldom see these parts fail.

If the modules have power, but don’t register with the system, most of the time it’s a problem with configuration.  OnSite FMS automatically detects all the components in the system for you, so you don’t have to waste time trying to figure out software settings. When the issue is resolved, the modules should automatically be recognized and come back online.
OnSite FMS Terminator plug with jumper

Check the Terminator

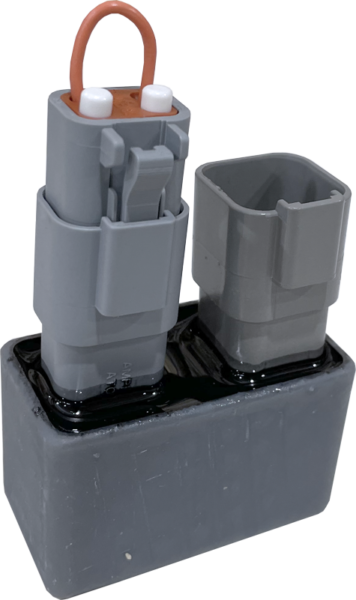
The terminator is extremely important to the whole system. Without it, the system can’t determine the number and order of modules in the system. If none of your modules are recognizing, start at the terminator.

Is the Terminator Plug & the Jumper Plug firmly seated? 

A loose connection can cause the whole system not to register. The Deutsch plugs we use are notorious for tight connections, so make sure the plugs are fully seated. 

Is the jumper plug attached to the terminator?

The jumper is very important. MOST systems only have a jumper plug that attaches to the terminator. If your system has a lift switch, this is where it plugs into the system.  If the jumper/lift switch is missing, it assumes the planter is turning around and turns off the entire system.

The terminators themselves can have issues, but it is very, very rare.

Power light on the OnSite FMS Bluetooth Module.Look for power.

Troubleshooting the Bluetooth module is similar to troubleshooting the OnSite module. First, check for power. Look at the bottom of the module for the red light. If it’s dark, you have a power problem.

The same tricks apply.

  1. Check your harness connections.
    Make sure everything is plugged in tight.
  2. Check your power source.
    Make sure you have a good connection on a constant power source.
  3. Test the harness.
    Use a multimeter by placing the red lead in pin 2 and the black in pin 1, then 4. You are looking for a 12V signal.

Check the range.

If you do have power, but no signal, it’s time to do some range tests. Bluetooth has a limited range by design (usually 30-40 feet). This range can be further impacted by interference signals from other nearby devices.

We need to make sure the module just isn’t too far away from the monitor. The test is easy. Take the screen out of the cradle and walk toward the bluetooth module. If you get connection as you get closer, you probably have the module mounted too far away from the cab or have too much interference from other devices.

You can either move the Bluetooth module closer to the cab or you can switch to a wired system.

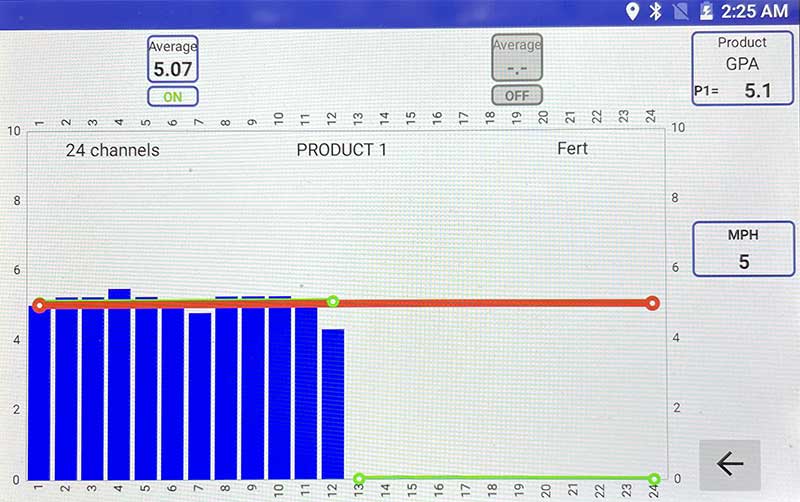
OnSite FMS automatically detects your speed and displays the flowrates based on the flow of product over the GPS sensed speed. If you aren’t moving, the gallons per acre will always be 0, so no bars will show up.

Speed Setup screen in OnSite FMS
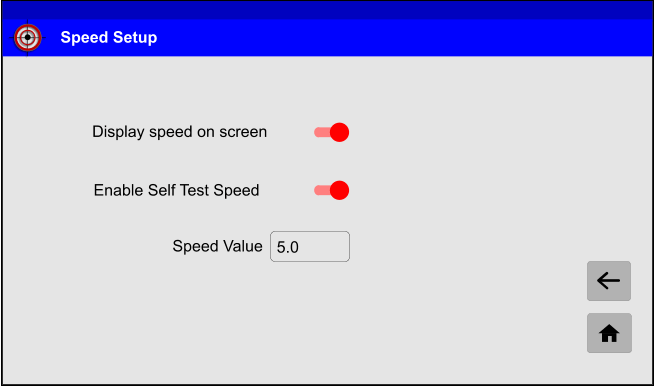
However, if you’d like to test the system while stationary, you can disable the GPS speed and just have the system pretend you are going a constant speed. This setting is called “
Enable Self Test Speed.” It is located on the Speed Setup Screen. You can get there from the tools menu or the run screen. 

  • From the home screen, click TOOLS, then SPEED SETUP, and enable/disable the feature. 
  • If you are on the RUN screen (with the blue bars for each row), just click the MPH button to get to the SPEED SETUP screen. 

Please note:

  • ENABLE the feature for stationary testing.
  • DISABLE the feature when you are out in the field to get accurate application rates based on GPS speed.

OnSite FMS uses free GPS. It’s the same GPS that is in your cell phone. It’s included at no charge in your monitor as a convenience.  

Some areas may have interference or limited GPS signal. OnSite is still monitoring flow on every row with the same effectiveness. The calculated GPA may jumping around due to bad GPS data, but the system will still show every slow down and blockage between rows on your planter.

If this happens to you, you have a couple of easy options to resolve the issue. (At least enough to keep planting)

  1. Use test speed to manually input your tractor’s actual speed.
    If you feel comfortable that your tractor is maintaining a constant speed, simply enable the test speed and type in the speed you are set at. 
      – To do this, click the MPH button from on the RUN screen. That will take you to the Speed Setup screen. There, turn on the Enable Self Test Speed option and type in how fast you are going. When you return to the RUN screen, the bars should hold steady.
  2. Switch from Gallons Per Acre to Gallons Per Minute.
    This switches the calculations from rate (defined by the flowmeters) over a given area (defined by the speed over time) to rate over a given time (defined only by the clock). Essentially, we just eliminate the GPS data  from the rate calculations.
      – Go to the Product Setup screen and switch the option from Gallons Per Acre to Gallons Per Min and adjust the target rate to the correct GPM. 
  3. Turn off the alarm and just roll with it. 
    Not the best solution, but it does stop the beeping. This issue will usually resolve itself in the next field when it gets a better GPS signal anyway. 
    – Go to the Display Setup screen and turn off the Audio Alarm option. 

As described above, first check all your connections. They can push out over time if the connectors weren’t locked into place.

If you have older GEN 1 modules that work great all morning, but disappear in the afternoon, you may have an older module that is subject to premature thermal shut down. There is a known issue with a small batch of OnSite Modules from 2021 that were built with the wrong thermal sensors. Affected models will go into thermal shutdown at temperatures far below the safe operating temperature of the unit.

On warm, sunny days (over 80°F) affected modules may shut down prematurely after a few hours of use. The module(s) will just go offline and grey out like the image below.

OnSite FMS run screen showing missing module

To troubleshoot, check the missing module on the planter to see if the power light on the bottom of the module is lit. If it is overheated, it will be dark. Turn off power to the system and let it sit (preferably in the shade) for 20 minutes to cool down. If everything comes back online when you start it back up, but it cuts out again after you run it for a bit, you likely have an affected module.

This issue has been fixed with better heat dissipation manufacturing techniques in GEN 2 modules and by updating back to the correct thermal sensor. This only affected a small number of modules built in 2021. If you think you have an affected module, please contact us at 605.213.1010 to arrange a warranty replacement for the newer design.

Frequently Asked Questions

Bluetooth Systems

OnSite FMS is simple 12V system. The power consumption for the OnSite Modules (usually mounted on the FlowBoards) is 30 Amps, but it only takes millivolts to run the system.

The display in the cab can run on a standard 5V circuit (like USB). This is really just charging the tablet battery.

Installation Tips:

There are lots of places you can get power on a planter. On John Deere planters, we generally recommend hooking to the accessory power port in the center of the planter, but you can get your power from almost anywhere on any planter. 

Never take power from pumps. It causes a power drop that can affect pump performance and trigger other issues down the line.

If you are getting power from a motor, make sure it isn’t switched or on a controller (power regulator) of some kind. 

Wired Systems

If you are using a wired system, all power runs through the harness, so it must be added to a 30Amp circuit to power the whole system. We recommend connecting the Power Harness to the battery whenever feasible. 

That is very common, especially if you have a new planter.  Almost any of our distributors will be able to get you the tanks, drop tubes, pumps, fittings, and hoses you’ll need to set up your planter. 

If you have specific questions, you can call our primary distributor, BENCO Products in Tea, SD and they can get you set up with a complete system!

Not a problem!

We just need to add some more FlowBoards to handle the extra rows. OnSite FMS’ software can accommodate up to a 72+ row planter, or a 64 row with dual products set up. OnSite FMS has you covered. 

Translate »